10. Fold-Down Play Table Toy Box
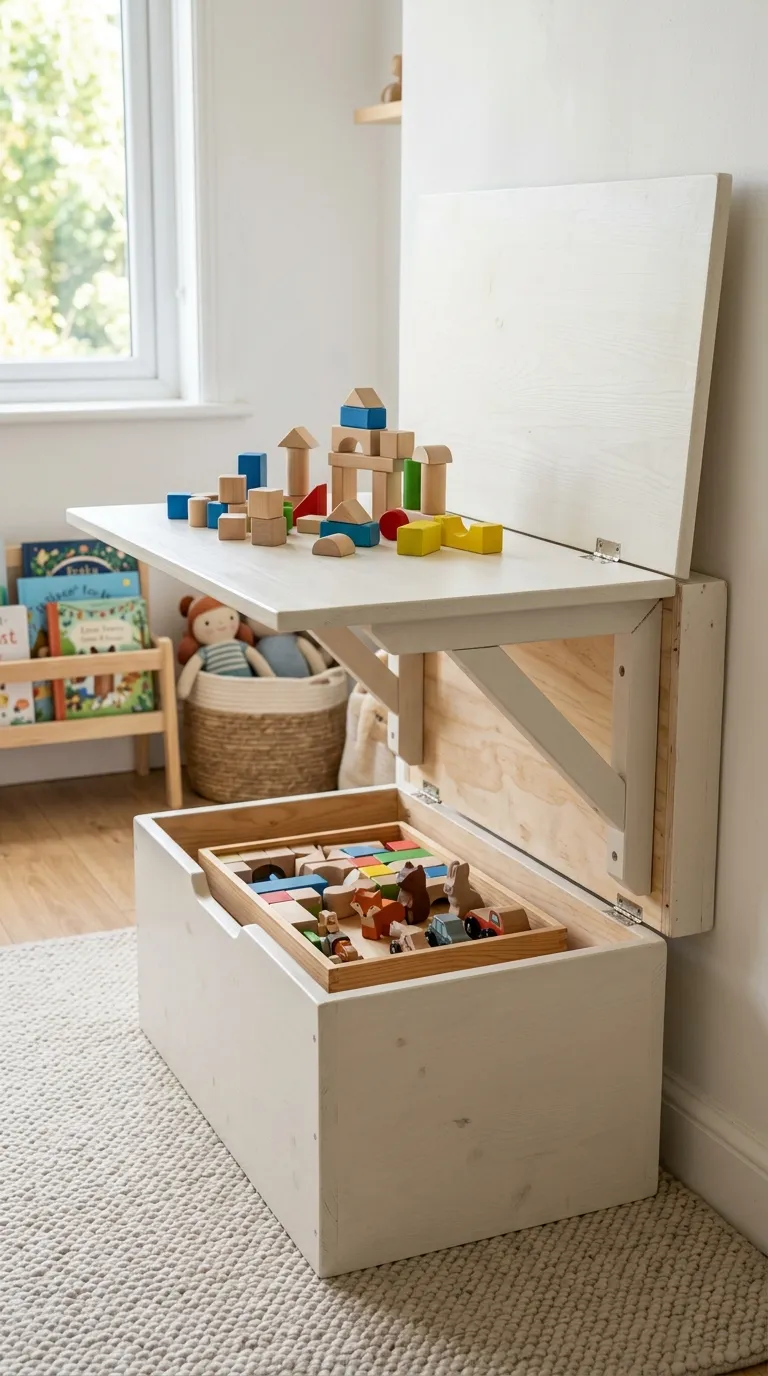
The cleverest design on this list turns a storage box into a play surface. The lid is hinged along one long edge, and instead of opening upward, it folds outward and down on a pair of folding shelf brackets to become a low table at roughly 18 inches high.
Build the box first, then attach the lid with a continuous piano hinge along the back edge. Install folding shelf brackets on the inside of the front panel and the underside of the lid so the table locks flat when open. When playtime is over, release the brackets, fold the lid down, and the toys disappear underneath.
Materials: 3/4-inch plywood, 1×3 pine for the face frame, piano hinge, two folding shelf brackets rated for the lid weight, child-safe paint, a small rug or play mat.
Time: one long afternoon. Difficulty: intermediate.
Test the bracket height carefully before you screw anything down. The lid needs to sit level when extended, and a half-inch error is noticeable when a child is trying to build a tower on it. Clamp everything in place, check with a spirit level, then fasten.
Inside the box, keep a shallow tray for small pieces so they do not get lost at the bottom. A piece of non-slip matting on the table surface stops bricks and puzzle pieces from sliding onto the floor.
How much does it cost to build a DIY wooden toy box?
Most of these projects land between $30 and $90 in materials, depending on the wood and hardware you choose. A pallet crate or an upcycled dresser drawer can cost almost nothing if you source the wood for free. The single biggest expense is usually the lid hardware — soft-close hinges cost more than plain ones, but they are worth budgeting for.
What is the safest hinge for a wooden toy box?
Look for damped, soft-close hinges made specifically for toy chests and storage benches. These hold the lid in place at any angle and lower it slowly rather than letting it drop. If you cannot find them, a lid stay or a lift-off lid with rope handles is a reasonable alternative. Whatever you use, avoid plain butt hinges on a heavy lid.
Which wood is best for a children’s toy box?
Pine and plywood are the most practical choices: affordable, widely available, and easy to paint. Cedar is naturally aromatic and resists moisture, which makes it a good pick for a chest that will sit against an exterior wall. Reclaimed pallet wood works if it is heat treated and thoroughly sanded. Avoid any wood with chemical staining or a strong odour.
Can I build a toy box without a workshop or power tools?
Yes, with a few adjustments. Have your local lumber yard make the straight cuts for you, then assemble with a hand drill and screws. A hand saw and a sanding block will handle trimming and edge rounding. The shaped animal box and the fold-down table are the two designs that really benefit from a jigsaw, so save those for later if you are starting out with minimal tools.
How do I stop a new toy box from smelling like paint?
Use water-based paint and water-based polycrylic rather than oil-based products, and let each coat cure fully before adding the next. After the final coat, leave the box in a well-ventilated space — a garage or covered porch — for several days before it goes into a bedroom. A small dish of baking soda inside the closed box can help absorb lingering odours.
How big should a wooden toy box be?
Aim for 30 to 36 inches long, 16 to 18 inches deep, and no taller than 18 to 20 inches for a child under six. That height lets them reach the bottom without climbing in, and it keeps the lid at a manageable weight. Bench-style boxes can run longer, up to about 48 inches, as long as the lid has a centre support.
How do I keep a toy box looking right as my child grows?
Choose a neutral base colour and let the accessories do the work. Baskets, labels, cushions, and the toys themselves change far more often than the furniture should. If you do want a refresh, repaint the front panel or swap out the handles rather than rebuilding — a change of hardware can shift a piece from nursery to big-kid room in about twenty minutes.
Pick the idea that matches the space you actually have and the tools you actually own, then build it a little better than you think you need to. Sand one more time than feels necessary, spend the extra few dollars on hardware that will not slam, and let your child help choose the colour. A toy box you made together becomes the piece they remember long after the toys inside have been outgrown — and honestly, that is the part worth building for.